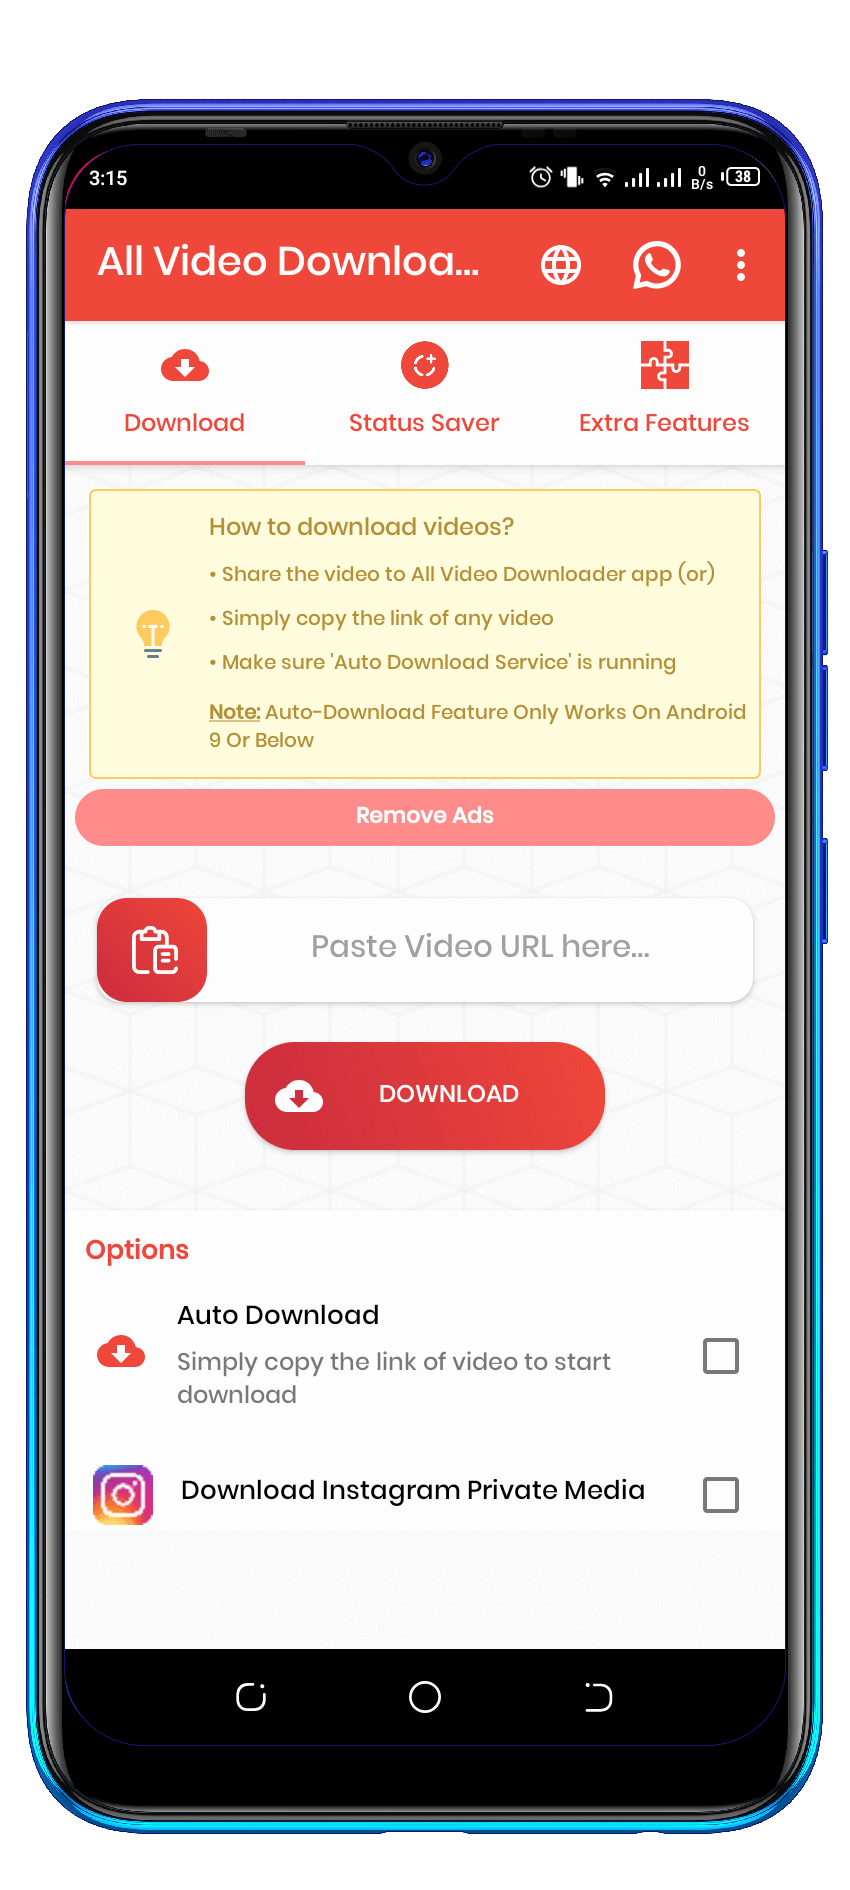


Most of the public prefer videos rather than reading something. So, in this case they face some trouble to save or download the video in high quality. But now their is no problem to download any video. What you want! By using this app you can have those video which you want in your files. By downloading any video. You will have the options to download Video files such as MPK, AVI, MP4, AVI, It automatically detects links from the App, so you just need to copy the link.
There will always be a certain set of audiences that are sure to be using your app. If you understand their character and temperature it will become easy to handle them.
Android Studio is the official integrated development environment for Google's Android operating system.
Kotlin is a cross-platform, statically typed, general-purpose programming language with type inference. Kotlin is designed to interoperate fully with Java, and the JVM version of its standard library depends on the Java Class Library, but type inference allows its syntax to be more concise.
Java is a general-purpose programming language that is class-based, object-oriented, and designed to have as few implementation dependencies as possible.
Extensible Markup Language (XML) is a markup language that defines a set of rules for encoding documents in a format that is both human-readable and machine-readable.
Adobe XD is a vector-based user experience design tool for web apps and mobile apps, developed and published by Adobe Inc. It is available for macOS and Windows, although there are versions for iOS and Android to help preview the result of work directly on mobile devices.
https://github.com/hdodenhof/CircleImageView
https://github.com/bumptech/glide
https://github.com/Shashank02051997/FancyToast-Android
https://github.com/HaarigerHarald/android-youtubeExtractor
https://github.com/amitshekhariitbhu/Fast-Android-Networking
https://github.com/AppIntro/AppIntro
https://github.com/adnanbinmustafa/Gloxey-custom-font-views
https://github.com/Athlon1600/youtube-downloader
https://github.com/Ayesh/InstagramDownload
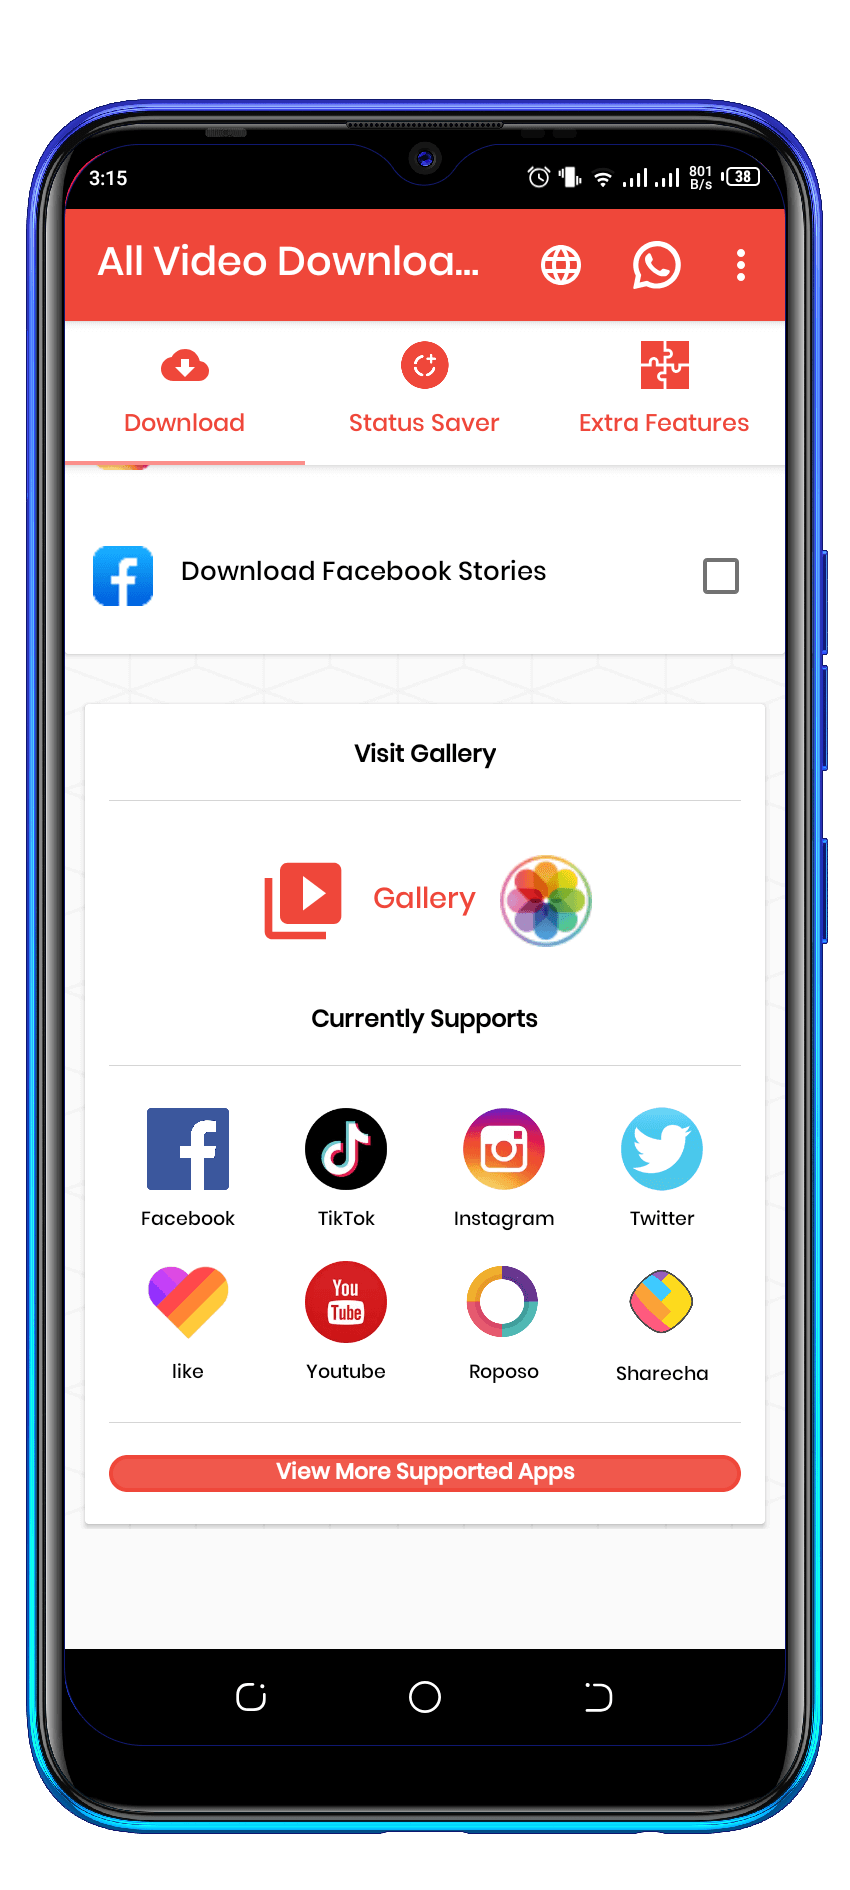
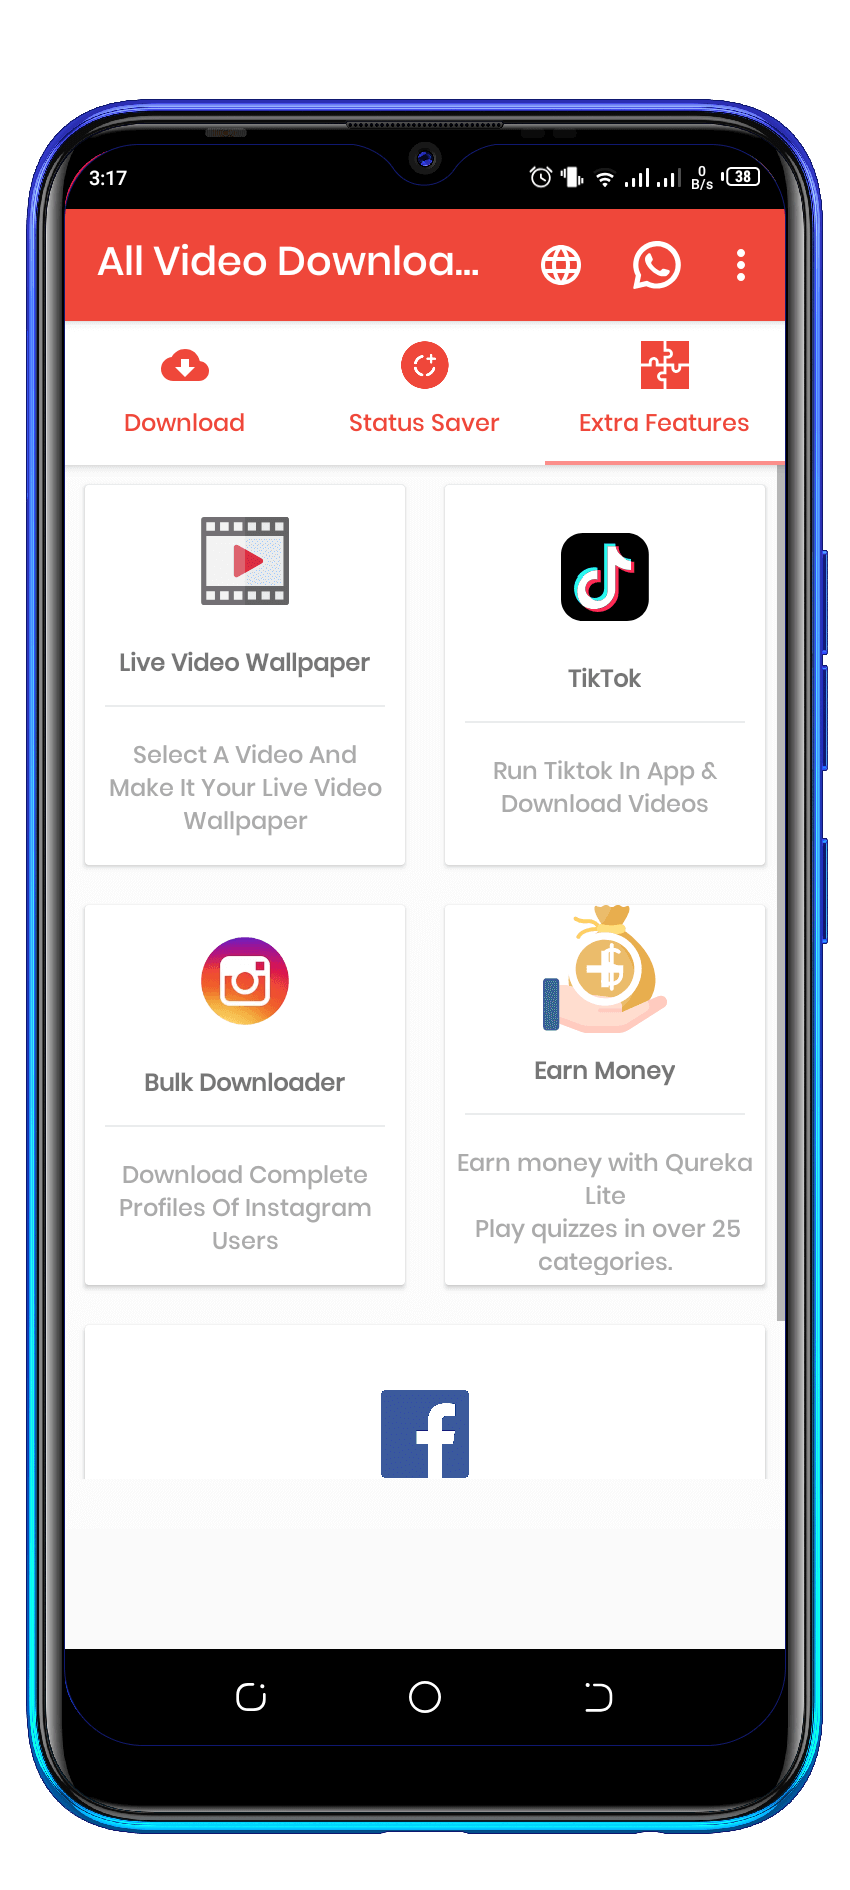
The features that are mentioned below is liked by most of the users. Just read it may be you can get some satisfaction.
There will always be a certain set of audiences that are sure to be using your app. If you understand their character and temperature it will become easy to handle them.
You need to download Android Studio (http://developer.android.com/sdk/index.html) which will also install the SDK manager.
The install, should automatically download all required components. If you do a manual setup, download at least the following components using the SDK manager: In the tools folder:
In the extras folder;
And at least one SDK version (At least Android 5.0). After you're done Now you can open Android Studio and continue your development.
Sometimes, the Gradle Build fail, here are some additional steps you can take: Android Studio might ask you to do download some additional SDK components in the 'messages' tab, simply follow the instructions to install and download the additional components to fix this.
Libraries(.jar) from the libs folder .All the Gradle defined libraries are linked (as found in app/build gradle) Make sure to wait until all loading is complete before manually (re)adding any modules and/or libraries!.
Before we can submit our app to the play store, you have to change your package name and compile your application.
The package name is you apps unique identifier. It is mentioned in your manifest and all your java files, and it is your project structure.
Create a new package (usually something like: com.mycompany.myapp) now drag the content from the com.utech.allinonevideodownloader app package (sub packages and files) into the new package. Also replace in strings and textual occurrences.
After you have done this, replace all the occurrences of com.utech.allinonevideodownloader with your new package name using Ctrl + Shift + R (Cmd +Shift +R on OSX).
If everything went correctly, com.utech.allinonevideodownloader.xxx packages in the project explorer should be changed into com.yourcompany.name, just as the package name in the manifest.
In this step we are going to create an apk, and you can run it on your phone!
You can now put this file: Xxx.apk on your phone, you will be prompted to check the unknown sources checkbox if you have not check edit already, you users won’t have to do this if they download the app from the google play store. Run directly, you can also connect your phone to your PC and run the app directly using Run>Run"App" (you can also debug using Run & Logcat).
If you want to add your admob ids then,
Replace your ids here then

Goto > String.xml > there you will find the following items change them and you are good to go:
<string name="AdmobAppId" translatable="false">ca-app-pub-7307921528560396~7952210008 </string>
<string name="AdmobBanner" translatable="false">ca-app-pub-7307921528560396/9017879668 </string>
<string name="AdmobInterstitial" translatable="false">ca-app-pub-7307921528560396/8882148296 </string>
Add your purchase code in the build.gradle file like this here
                  buildConfigField "String", "PURCHASE_CODE", '"YOUR_PURCHASE_CODE"'

                  eg.   buildConfigField "String", "PURCHASE_CODE", '"XXXX-XXXXXXXXX-XXXXX"'
This is assuming you already have Android Studio (version 2.2 at the time of writing), its Android SDK (version 24) and Java SDK (at least 7) installed.
In order to ensure Android Studio support Kotlin, the first thing is to install the Kotlin Plugin for your Android Studio.
Android Studio → Preferences… →Plugins → Browse Repository → type “Kotlin” in search box → install
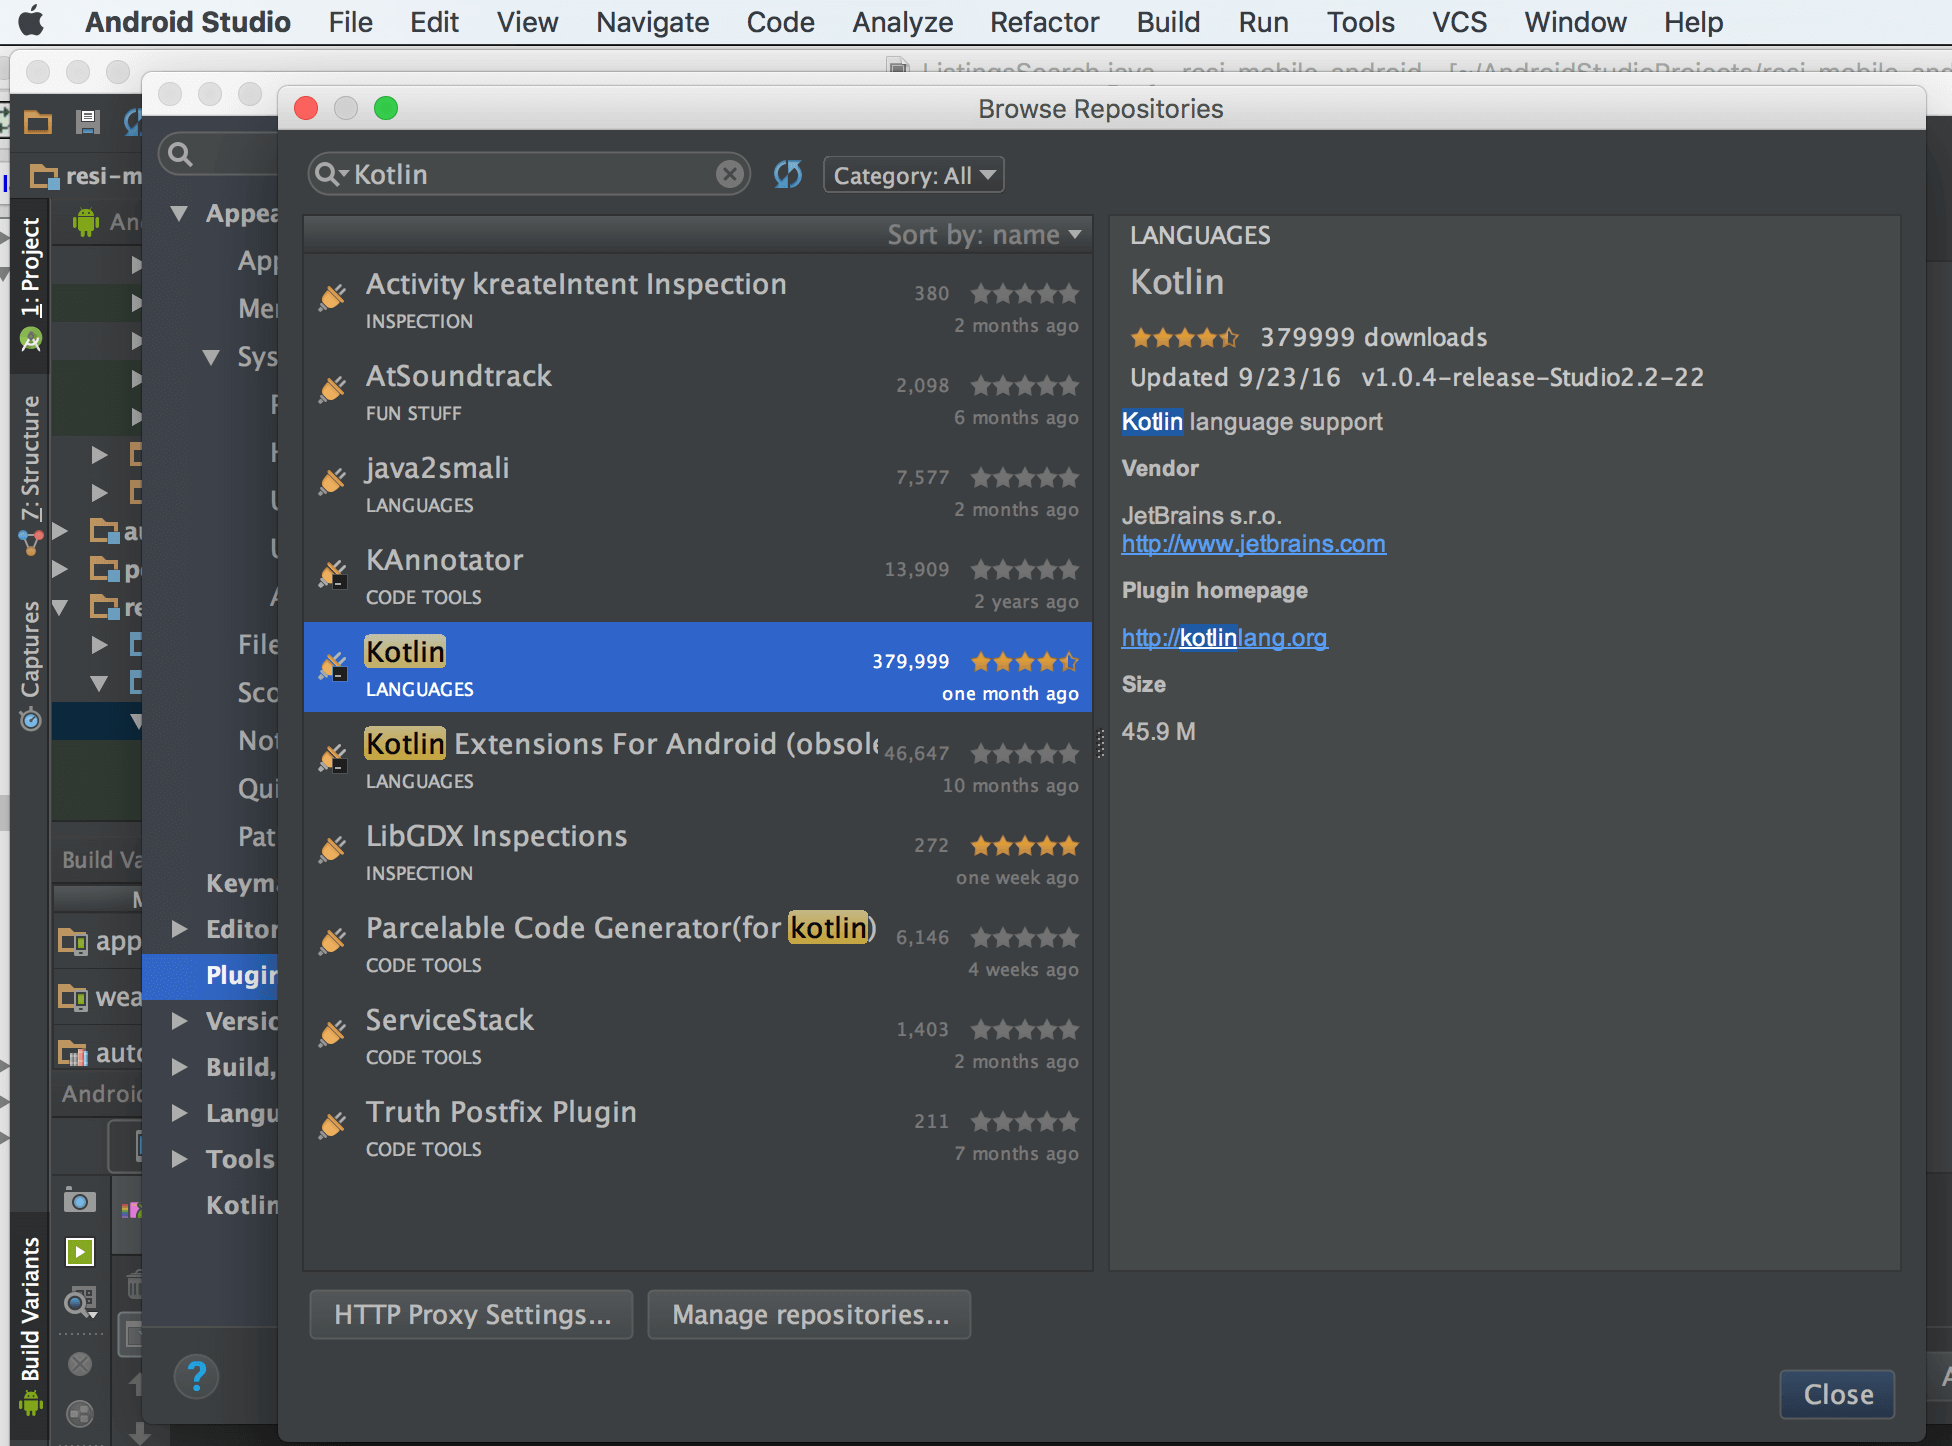
Plugins Browser, where you can find Kotlin Plugin for you to install.
That’s all the generically applied to your Android Studio. Only needed to do once per installation of Android Studio.
For gradle to have Kotlin support, add the two classpaths below, i.e. Kotlin-Gradle-Plugin and Kotlin-Android-Extensions. Also in this file I setup the variable to define Kotlin version, that could be shared by all.
  buildscript {
  ext.kotlin_version = "1.1.1"
  ext.supportLibVersion = "25.3.0"
  repositories {
     jcenter()
    }
    dependencies {
      classpath 'com.android.tools.build:gradle:2.3.0'
      classpath "org.jetbrains.kotlin:kotlin-gradle-plugin:$kotlin_version"
      classpath "org.jetbrains.kotlin:kotlin-android-extensions:$kotlin_version"

         // NOTE: Do not place your application dependencies here; they belong
         // in the individual module build.gradle files
        }
      }
In the module that will use Kotlin, you will add the Kotlin library into it’s Build.gradle. Also remember to apply both the Kotlin Android and it’s extension plugin to your project (I often forgot this, after add the library).
apply plugin: 'com.android.application'
apply plugin: 'kotlin-android'
apply plugin: 'kotlin-android-extensions'
  android {
     // ... various gradle setup
      }
        dependencies {
          compile fileTree(dir: 'libs', include: ['*.jar'])
            testCompile 'junit:junit:4.12'
              compile "com.android.support:appcompat-v7:$supportLibVersion"
                compile "com.android.support:recyclerview-v7:$supportLibVersion"
                  compile "org.jetbrains.kotlin:kotlin-stdlib:$kotlin_version"
                    }
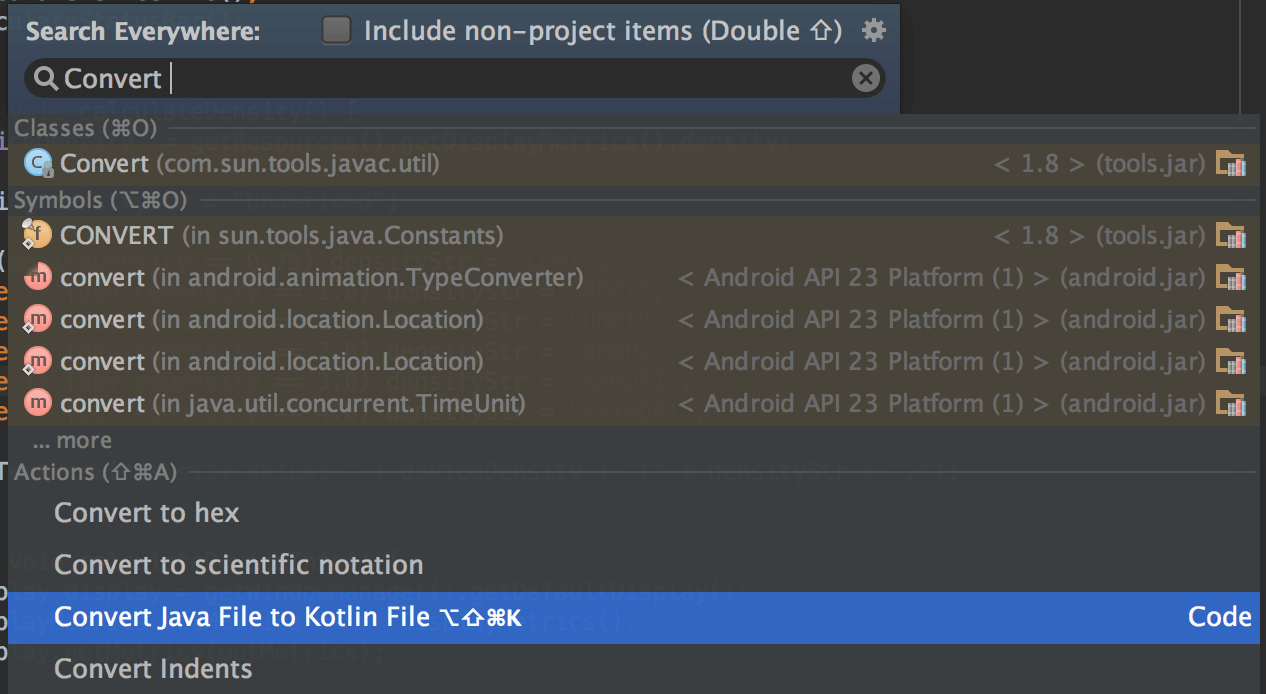
Now you have setup Kotlin for your app development, you could start writing Kotlin code (in .kt extension). Another way is convert your Java file to Kotlin, using Shift-Alt-Cmd-K or Shift-Shift + search Convert Java File to Kotlin File.
Setup:
https://firebase.google.com/docs/cloud-messaging/android/clientto create admob ids watch this video:
   //TODO NOTE: Should make both false if you wqant to upload to the playstore

   const val showyoutube = true
   const val showsoundcloud = true


  //TODO NOTE: if you disable ads you can make this false
   const val show_Ads = true
   const val show_startappads = true
   const val show_earning_card_in_extrafragment = true
Check the Constants file change the value and you are good to go

Utils/constants.kt file if you wish to use apis on your own server
To get the apis contact us at infusiblecoder@gmail.com and we will provide you a python package and the installation procedure for it .
How to setup inappsubscription in video downloader app.

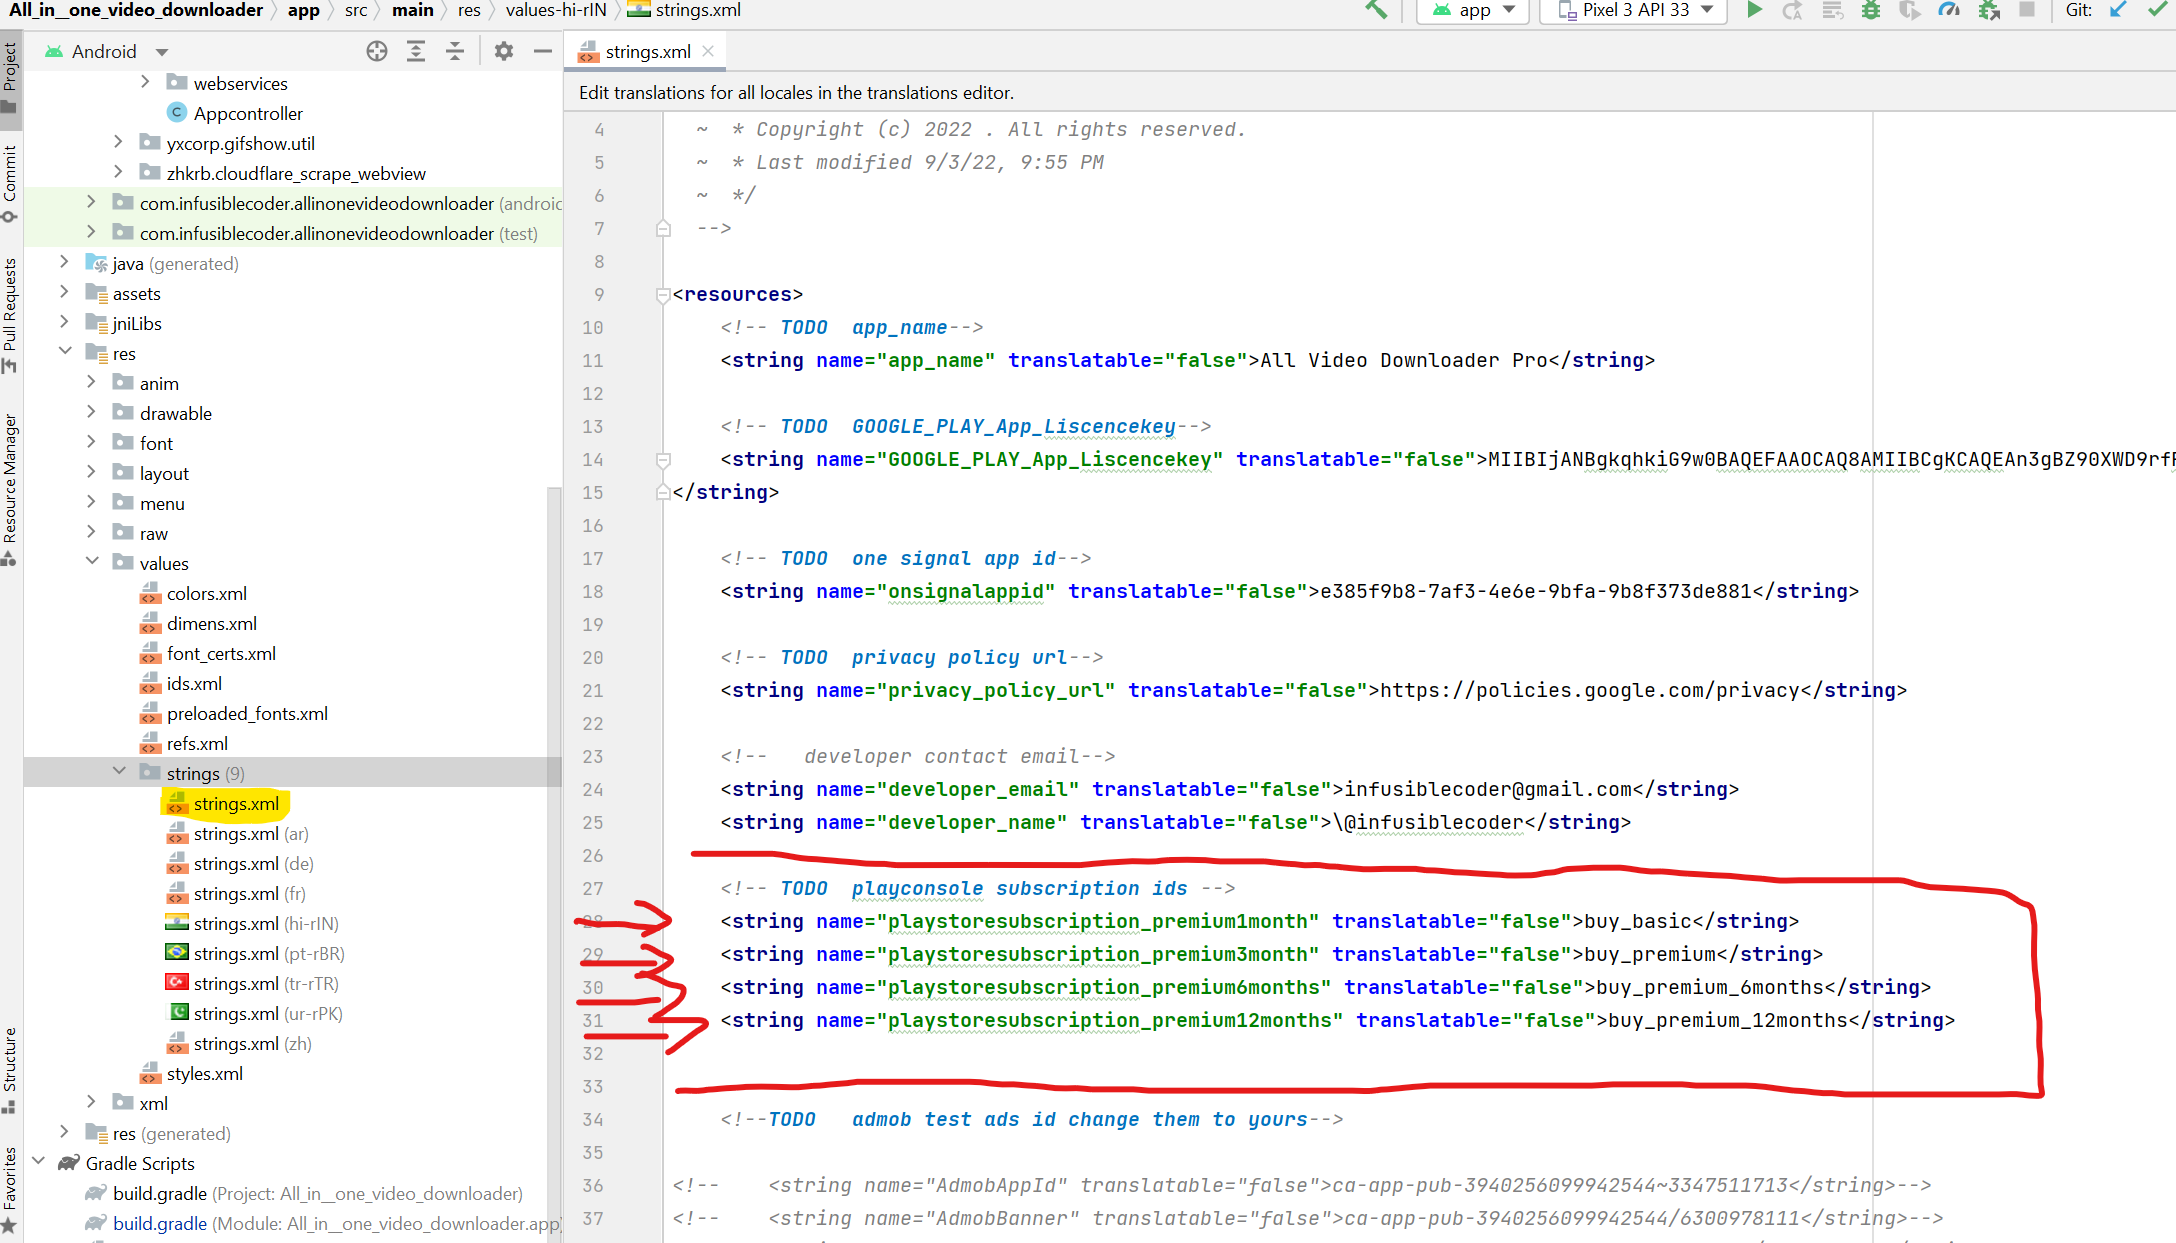
Replace ids here in string.xml file
       <string name="playstoresubscription_premium1month" translatable="false"&gbuy_basic</string>
       <string name="playstoresubscription_premium3month" translatable="false"&gbuy_premium</string>
       <string name="playstoresubscription_premium6months" translatable="false"&gbuy_premium_6months</string>
       <string name="playstoresubscription_premium12months" translatable="false"&gbuy_premium_12months</string>
This project meets Google EU/EEA (European Economic Area) consent and privacy policy requirements. Consent information is checked and requested in "main" file. User can choose between personalized and non-personalized ads. There is also an option in "Settings" about ads personalzation, so users are able to change their consent if they change their minds. This is one of the Google requirements, if you want your app with ads to be published in the Google Play Store. To make your app compatible, you must have valid & web published privacy policy URL (which should be used when showing consent form). Important: If you are gonna publish your app in the Google Play Store, you have to provide privacy policy URL there, too. Privacy policy for this app is generated through https://app-privacy-policy-generator.firebaseapp.com/. This tool can help you by automatically creating and publishing privacy policy for you app.
Most of the icons used in the application are vector icons (XML files) from the Google Material Design icon pack.
Material icons are delightful, beautifully crafted symbols for common actions and items. They are open source distributed and free for everyone (to use).
This item is sold exclusively on Envato Market (CodeCanyon). If you purchased the item and like it and its documentation please, rate it.
This Envato Market (CodeCanyon) item comes with NO support from the author. More information about Envato Market (CodeCanyon) item support: https://codecanyon.net/page/item_support_policy
If you have any questions, problems or recommendations, please do not hesitate to contact me anytime. I will try to answer you as quickly as possible. Email address: infusiblecoder@gmail.com
No Refund is possible if the app is used or modded in any way , uploaded or not . refund will not be tolerated.